Telemetry is like a high-tech bell, and one of the very few modern improvements on traditional falconry. It helps to allow the falconer find a bird, or even locate a bird who has been swept away by winds or chased off by other raptors. Telemetry is made of two pieces - the transmitter and the receiver. Some have a third component which is a headset to help them track a signal more precisely.
Transmitter
The transmitter is what goes on the bird so that you can locate the bird again. This consists of a small piece that transmits and contains batteries and then an antenna. Transmitters are typically mounted on the leg or tail, but are now being mounted on the back as well. As an apprentice, a transmitter is an excellent investment to help you fly your hawk with less fear of losing her. As soon as you receive your transmitter, make a note of its frequency and channel on a few models of receivers. Should you lose your bird, you can contact other local falconers with the information in case they pick up her signal, also helping you to regain your hawk. For this reason you'll want to have good batteries, and remove them from the telemetry placing each battery into a separate container to reduce the amount of drain on the batteries. Carrying extra batteries can also help when you drop one or find that one is drained. Any transmitter can fall off or get ripped off in any number of ways. If you have multiple transmitters, color coding each and writing down each one's frequency as well as marking it on the receiver can be a great help in reducing confusion.
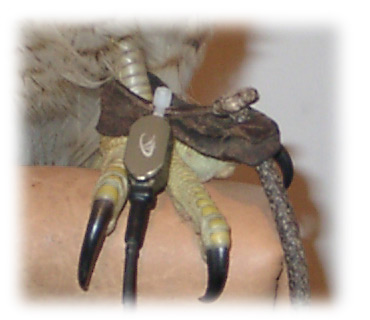 |
Leg Mounted Transmitter
A transmitter mounted on the leg using a cable tie to secure it to the anklet. One potential disadvantage with the leg mount is that a long antenna can strike things or make contact with a power line when the bird might otherwise be safe. Note that although a cable tie is used, the cable tie is attached to the leather anklet. A cable tie should always be attached to leather and never be attached directly to the bird. |
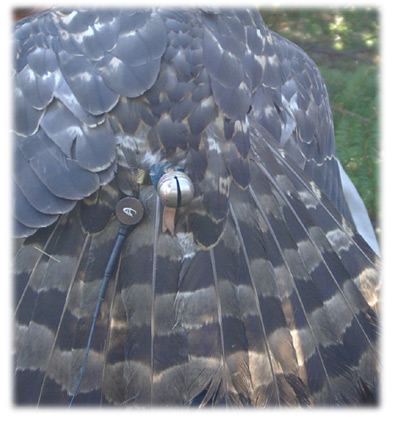 |
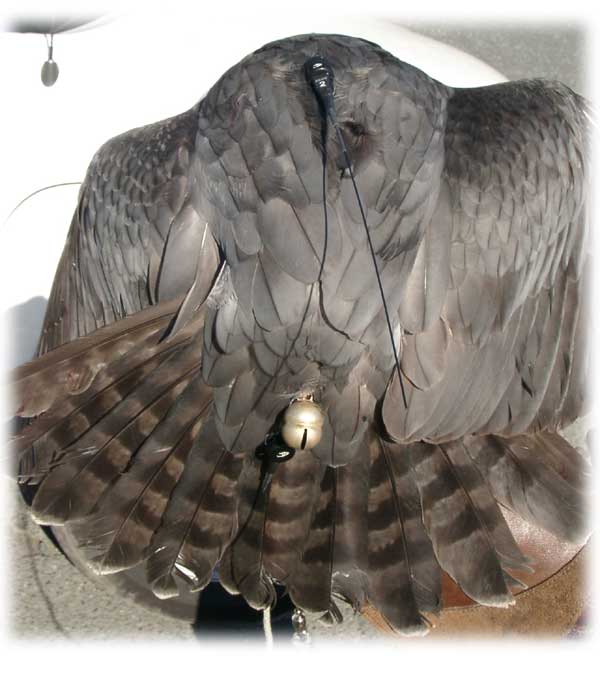
Tail Mounted Transmitter
A transmitter mounted on the tail next to a bell. A tail mount requires a piece be attached to the shaft of the feather so that the transmitter may be attached and removed from the mounting. One consideration with a tail mount is the potential for breakage. If the bird is annoyed with the mounting she may pull and bite at the feather, even pulling it out. If the mounting gets caught on anything, the feather may break or pull out completely. |
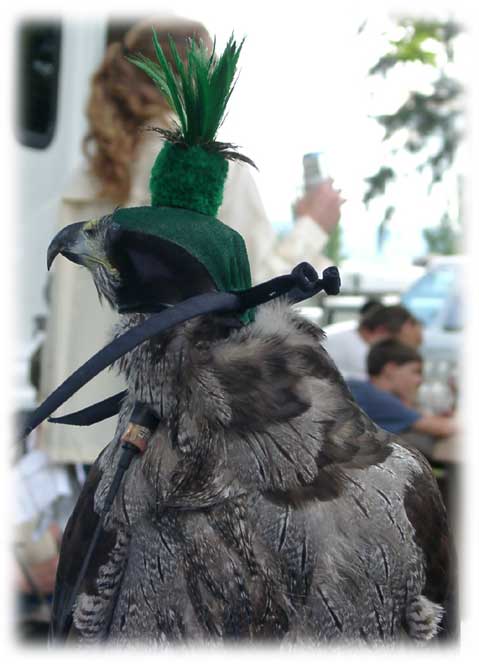 |
Neck Mounted Transmitter
A transmitter mounted around the neck of a Goshawk. The advantage of mounting here is that the transmitter antenna is not likely to strike electrical wires, wrap around branches, or entangle in anything. Traditionally a short leather strap is used to attach a bell around the bird's neck, but many falconers now prefer an elastic band of some sort and will mount the transmitter to this, too. A thin elastic band or a 1/16" covered elastic (can be found in sewing stores) works well. The warning with the elastic is that it must be tight enough to prevent the bird from getting a toe caught in it if she scratches or getting her lower mandible caught in it if she preens or catching on something as she's hunting, yet loose enough to allow her to eat and cast comfortably. The other warning is to select a material that will break. If the neck transmitter elastic gets caught on something and the elastic does not break, chances are the bird's neck will break. As such a Scunci hair band is a bad choice of materials as it just won't break. A thin strip of leather is good as is a thin rubber band. If the bird catches it on a twig or catches a talon through it, she will easily break the band. Some falconers can go without ever having an incident with any neck attachment material, however it should be cautioned that the loop can catch and a material that will break can save a bird's life. A zip tie or cable tie should never be used around a bird's neck as it can always tighten and strangle her. As a point of reference, an average Sharp-Shinned Hawk has a neck diameter about the size of a dime (about 18mm), an average Cooper's Hawk has a neck diameter about the size of a nickel (about 21.2mm), and an average Goshawk has a neck diameter of about the size of a quarter (about 25mm). The elastic should not be stretched over this coin when it is measured, but just laid over without any stretching. This is the same size for measuring a jangoli for a bird. The risk of a wrong size or material is that a bird could strangle herself or could be prevented from casting. |
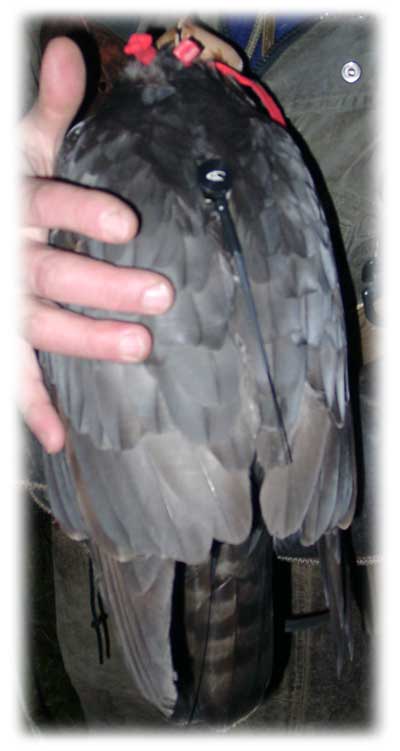 |
Back Mounted Transmitter
A backpack mounted transmitter on a Goshawk. The bird is cast and a backpack is formed from Teflon ribbon. The ribbon passes over the "shoulders" and to the back where a plectrum (typically a guitar pick) is secured. A tail mounted transmitter is then attached to the plectrum. Since the new transmitters can be turned on and off in an instant with a magnet, the transmitter can stay in place on the bird's back without draining the battery. The backpack is typically removed for the moult. |
 |
Two Transmitters Mounted
Two transmitters mounted on Steve Layman's Goshawk - a back mounted transmitter and a tail mounted transmitter. Mounting multiple transmitters is a failsafe technique, especially for birds that a falconer really wants to ensure are found. |
Receiver
The receiver is what allows you to pick up the transmitter's signal. A good receiver is an expensive piece of equipment. You may want to work out a scenario where you share a receiver with another falconer and split the cost. Hopefully it will not be used much. Some falconers have encountered problems where their handheld receivers are mistaken by observers for guns. Falconers with a receiver that could be mistaken for any sort of weapon have often taken the precaution of spray painting the receiver pink or another color not easily mistaken for a weapon.
Telemetry Basics
It's a skill to use a telemetry signal well to locate a hawk. First, before releasing the bird to hunt, turn on the receiver and check the signal. There may be multiple signals, or a signal may be coming from another bird and your bird's telemetry is actually turned off. Checking for one signal and ensuring that it is from the bird you assume it is from is important. Many falconers have turned on a receiver and tracked a signal back to their truck to find another transmitter that was left on. The key to effective use of telemetry is practice. Have a friend hide a transmitter and practice trying to locate it. Practice yourself placing a transmitter in different places and different environments noticing how the environment and orientation of the transmitter change the signal you receive.
The transmitter is sending out radio waves and the receiver is receiving these waves. Since these waves are being sent out from a single point, the waves can be blocked or can bounce. A bird may be to the north of a chain link fence, and you may be north of a chain link fence, but your receiver is picking up a signal to the south because the radio waves are bouncing off the chain link fence and reflecting back scattered in many directions. This can happen with buildings, particularly metal buildings, cliffs such as basalt, and many other hard surfaces. Similarly the waves may be absorbed giving a bit of a shadow. A bird may be to the north of you, but on the opposite side of a large tree trunk. The waves may be passing on either side and giving what appears to be two signals that the receiver is picking up. It's important to try to differentiate between a direct signal and a rebound signal.
The transmitter placement and type of transmitter will also make a difference in the signal that is given off. A leg mounted transmitter that has a long antenna will be laying horizontally if the bird in on the ground on a catch. The ground may absorb or reflect the signal depending on the material. The horizontal antenna will also need to be considered when orienting the receiver for best reception.
When you pull out a receiver to find the transmitter, first find the signal on full gain and the volume at a reasonable level. Check and re-gauge this by slowly turning in a circle holding the receiver horizontally and level as you turn. You should hear differences in the signal volume with the loudest signal likely being the direct signal. Some receivers also have a visual meter where you can watch a small indicator arm sweep which will help in determining the relative signal strengths. There may be a second loudest signal at exactly 180° away from the loudest signal. This may be a rebound from the environment and should indicate that the loudest signal is the direction of the transmitter. Of course in certain environments this may not hold true. Try holding the receiver directly vertically and turning slowly in a circle. Angle the receiver in different orientations and tip it so it is not level to account for the possible different angles the transmitter antenna could be at. The best angle is likely a 90° angle between horizontal and vertical to maximize the transmitter's signals against any environmental interference. You are trying to check and re-check the signal ensuring you are getting the primary signal and not a back door signal. The signal will be the strongest when the receiver's antenna and the transmitter's antenna are aligned in the same plane. If you are standing in a valley or a depression in the ground, try to get to higher ground to improve the reception. Direct line of sight between the transmitter and the receiver will give the best and most accurate direction. Getting higher up will help reduce the obstacles to the signal being received. Many falconers have even paid private pilots to take them up so that they can search for the signal and hope to recover a bird. As you work towards the strongest direct signal, sorting out what is interference and what is rebound, you will begin to turn the gain down to the lowest level that gives an audible signal. This will help to get the most accurate location of the bird. Always keep the antenna sweeping to identify the signal location and to identify any movement of the signal.
Telemetry can be used to identify which direction a bird is in, if it is moving, how far away the bird is, and how high up the bird is. If a very strong signal is received no matter which way the antenna is held, then the transmitter is very close. You may be under it, on top of it, or next to it. It may be bushes, trees, or tall grass is hiding the bird. At really close ranges, and with receivers that have an antenna that can be detached, there are some techniques where the antenna is removed and the falconer uses his own body to shield the receiver unit from the signals.
Finally, don't forget to observe what is going on around you. If there are crows mobbing, chances are they know where your Red-Tail is. If there are some little birds who are angry and chattering, they may know where your Cooper's Hawk is. Listen for her bells.